| 8. UI Components (II): OutlineView and PropertySheetView | ||
|---|---|---|
 |  | |
We need to outline what is possible and what is impossible with the non-renewable resources of the Earth. What role will technological improvement play? Taking all this into account, what kind of life can we produce in the best way for 10 billion people? That's a problem that needs to be solved.
The OutlineView and the PropertySheetView are two other great UI components in the NetBeans Platform, and are very easy to use once you get the idea. This section explains how to use them.
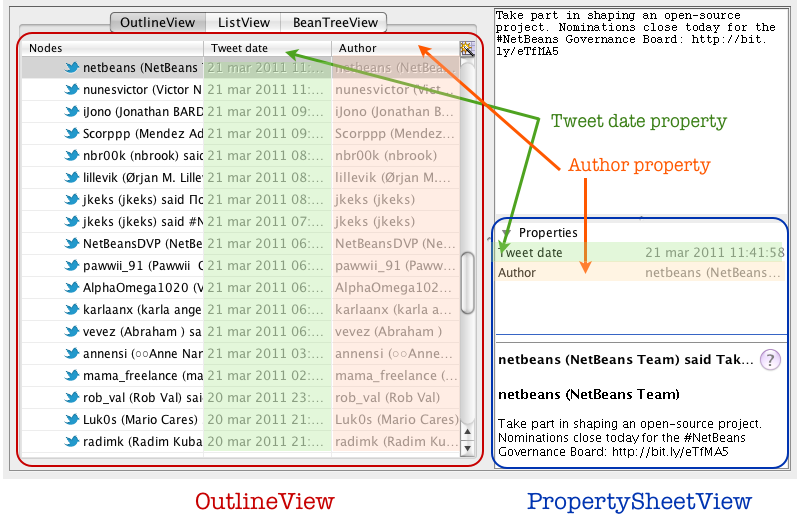
Both OutlineView and PropertySheetView are used to display Properties of Nodes. In an OutlineView each column of the table is a Property of a node, whereas in a PropertySheetView you have different properties grouped in PropertySets. In our sample application we have defined two properties for TweetNodes: one for the date the tweet was sent and another one for the author of the Tweet.
Before learning how to use these components let's quickly review how to define properties for nodes.
So let's add two properties to our TweetNode: the author of the tweet and the date. Node properties are grouped in "sets of properties" (basic properties, advanced properties, etc.) and these "sets" are again grouped in a "sheet" of properties. To add the "tweet date" and "author" to our "TweetNode" we have to override the "crateSheet()" method, like so:
/**
* This method is invoked once to create a Sheet of Properties of this node.
* @return A Sheet of Properties for this node.
*/
@Override
protected Sheet createSheet() {
// Create an empty sheet
Sheet sheet = Sheet.createDefault();  // Create a set of properties
Sheet.Set set = Sheet.createPropertiesSet();
// Create a set of properties
Sheet.Set set = Sheet.createPropertiesSet();  // Define properties and add them to set (see below)
// Add the set of properties to the sheet
sheet.put( set );
// Define properties and add them to set (see below)
// Add the set of properties to the sheet
sheet.put( set );  return sheet;
}
return sheet;
}
... here we create a "Sheet" to hold sets of properties... | |
...here we create the set of properties... | |
...and here we add the set to the sheet and return it... |
Now comes the tricky part: we have to add properties to the set of properties. Let's see how we add a "Date" property:
// The Date read-only property
Property tweetDateProperty =
new PropertySupport.ReadOnly<Date>(
DATE_PROPERTY, // Name of the property
Date.class, // Type of property value
"Tweet date", // Display name
 "The date where the tweet was sent" // Description
) {
@Override
public Date getValue()
throws IllegalAccessException, InvocationTargetException {
// Returns this node's entity date
return new Date( tweet.getTimestamp() );
"The date where the tweet was sent" // Description
) {
@Override
public Date getValue()
throws IllegalAccessException, InvocationTargetException {
// Returns this node's entity date
return new Date( tweet.getTimestamp() );  }
};
set.put( tweetDateProperty );
}
};
set.put( tweetDateProperty ); 
To define properties for nodes we use the PropertySupport class. Since our property is read-only (nobody would want to change the tweet data) we use the PropertySupport.ReadOnly base class. Of course Node properties can be read-write, so you can edit the properties of a node in the PropertySheetView or in the OutlineView, but this is not covered in these notes. Let's review the code above:
All properties have a "name". I define the names of the properties as a constant. This will have importance later on. | |
The second argument to the constructor is the type of the value of the property. In our case the type of the Tweet date is java.util.Date, so we pass here a Date.class. | |
All properties have also a "displayName". This "displayName" is used in the PropertySheetView component as the "visual name" of the property. | |
And all properties also have a "short description". This short description is used in the PropertySheetView as a guide to the user. | |
Also all properties have a value. What we do here is we obtain the Tweet entity that the TweetNode represents and just return its date. | |
Finally we just add the property to the set of properties. |
And we're all set! The OutlineView will attach to the first ExplorerManager.Provider in the component hierarchy and will render its "rootContext" automagically. As you can see it's not that complicated after all. Of course, you can add some extra features. You can add custom editors to properties, so the user can edit them visually. To do that you just have to override the getPropertyEditor()" of the Property and specify a custom PropertyEditor of your liking, such as this one for float values.
For more information about Properties, PropertyEditors and all this stuff you can see this JavaBeans Learning Trail.
An OutlineView works like a mix between a JTree and a JTable, this is, it allows you to display hierarchical information (such as our relationship between a Query and its Tweets) and, for each one of the items you can show some of its properties as columns.
Using an OutlineView in your Swing applications is very easy: just create a new one, customize the columns and add it to a JPanel or any other Swing container. Like so:
    // Create an OutlineView with some properties and add it to this window.
    outlineView = new OutlineView();
    outlineView.getOutline().setSelectionMode( ListSelectionModel.SINGLE_SELECTION );
    outlineView.setPropertyColumns(
        TweetNode.DATE_PROPERTY, "Tweet date",
        TweetNode.AUTHOR_PROPERTY, "Author");
    pnlOutlineViewContainer.add(outlineView, BorderLayout.CENTER);
The important method here is "setPropertyColumns": this one allows you to specify the properties you want to show and the name of the columns. You can add as many properties and column names as you want. In our case we want to add the DATE_PROPERTY property (note how we use a property name) with column title "Tweet date" and the AUTHOR_PROPERTY (again a property name) with the column title "Author"). |
Note that the OutlineView acknowledges lazy-loading of children nodes, because it does not require all data to be ready before rendering (like JTable and TableModel do). This means that if you group children nodes in sets that are loaded lazily you can show a huge amount of information using this Swing component. Cool, isn't it?
The PropertySheetView is, as its name implies, a visualizer for PropertySheets. This is a very advanced Swing component, because it acknowledges the java.beans.PropertyEditorManager and uses the registered PropertyEditors to edit node properties. This means that you can build your own spiffy "Date Editor" (or use one from a good component library) and you can build a PropertyEditor to edit property dates with it, for instance. Or you could build your own Float Property Editor to allow your user to edit float values, for instance, and use that editor in a PropertySheetView.
Using a PropertySheetView in your Swing application is, again, very simple: you just have to add it to a JPanel or elsewhere and you're all set:
    // Create a PropertySheetView and add it to this window
    propertySheetView = new PropertySheetView();
    pnlPropertySheetContainer.add(propertySheetView, BorderLayout.CENTER);
The PropertySheetView will attach itself to the first ExplorerManager.Provider in the component hierarchy and will render its data.
So in this section we've seen two of the most powerful UI Components in the NetBeans Platform: the OutlineView and the PropertySheetView. During the process we've seen how to define Node properties, and we've seen that these properties can be edited with custom PropertyEditors.
We are now ready to see how to add actions to nodes. But that will be another section...
| | | |
| 7. NetBeans UI Components (I) |  | 9. Action! |
blog comments powered by Disqus