| 6. The ExplorerManager | ||
|---|---|---|
 |  | |
One ring to rule them all, one ring to find them, one ring the bring them all, and in the darkness bind them. In the land of Mordor where the shadows lie.
In the previous sections we've learned about the NetBeans Nodes API. From what we have seen you may think that NetBeans Nodes are similar to Swing's TreeNodes, that are visual representations of "user objects" or entities. Well, if so you are on the right track. NetBeans Nodes are much more powerful, as we'll see all allong the way.
In Swing each UI component has an associated "model" that holds both the data you want to represent and the internal state of the UI component. For instance, a JTree uses a TreeModel, a JList uses a ListModel, a JTable uses a TableModel, a JButton uses a ButtonModel, etc.
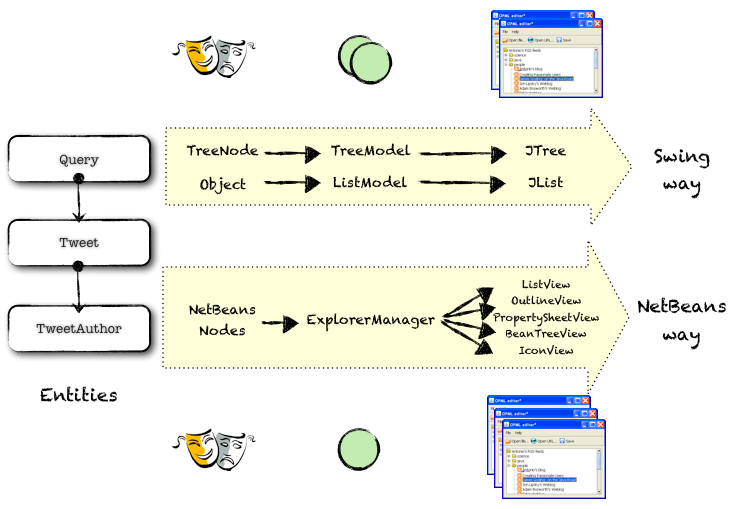
Developing UI components in NetBeans is usually easier because most NetBeans UI components use just a single "model": an ExplorerManager. So when you build an user interface with NetBeans you just use a single model: a single model to rule all UI components. This is, a single ExplorerManager works with a ListView, an OutlineView, or a PropertySheetView, for instance. In this section we'll learn about ExplorerManagers.
When doing Swing you set the TableModel (TreeModel,ListModel) within the JTable UI Component (JTree,JList) you want to populate with data by invoking the "setModel" method on the component. Of course, since the NetBeans Platform is based on Swing, you still can do this in your NetBeans Platform applications.
Since the NetBeans ExplorerManager is used to rule different UI Components at once you don't want to invoke a "setModel" on each one of them, right? There must be a way for NetBeans UI components to find the model they should render.
Instead of associating your ExplorerManager with each specific UI Component you associate it with a UI Component container. This is, with a JPanel, a JDialog or a JFrame (or a NetBeans specific container called TopComponent, not covered here).
When you add a NetBeans UI component to a component hierarchy, the component will automatically scan all its parent containers seeking for the first one that has an ExplorerManager. It then will use that ExplorerManager as the source of all its data. That automatic behaviour is very useful, because you don't have to remember to "setModel" on each component: they automatically discover the "model" they have to render.
That's the NetBeans way to do things: a single ExplorerManager you set on a container can rule different UI child components at the same time. No need to have different TableModels, and TreeModels and ListModels: you can rule all those components with a single ExplorerManager. Cool, isn't it?
To associate a UI container with an ExplorerManager you must implement the ExplorerManager.Provider interface in your UI Component container. In our example application we have done that in the main JFrame, like this:
/**
 * NBTweetingMainFrame is a plain JFrame that uses different NetBeans components.
 * This class is a ExplorerManager.Provider, so all NB UI Components embeded within it
 * will use this frame's ExplorerManager as the object containing the main nodes.
 * @author Antonio Vieiro (antonio@antonioshome.net)
 */
public class NBTweetingMainFrame
extends javax.swing.JFrame
implements ExplorerManager.Provider {

  private ExplorerManager explorerManager = new ExplorerManager();

  public ExplorerManager getExplorerManager() {
    return explorerManager;
  }
Now you can add NetBeans UI components to that frame, and those components will use that instance of ExplorerManager as its source for inspiration.
Note that you could add a JPanel with another instance of ExplorerManager if you wanted to. Then all components added to that JPanel will then use that other instance of ExplorerManager. I hope you get the idea.
Now that you have created an ExplorerManager and associated it with a UI Container you have to populate it with data, i.e, with visual representation of data, i.e. with Nodes.
We do this when the user presses the "Search" button in our JFrame, at that moment we create a "Query" entity with the query, and then a QueryNode that visually represents the Query. We then tell the ExplorerManager that we want to render the QueryNode using the setRootContext method, like so:
    private void cmdSearchActionPerformed(java.awt.event.ActionEvent evt) {

      // To perform a query we create a query entity...
      Query query = new Query();
      // ... set its keyword
      query.setKeyword(txtSearchTerm.getText());
      // Create a node from the query...
      QueryNode node = new QueryNode(query);
      // ... and set this explorer's manager root node to it
      explorerManager.setRootContext(node);
      // Now all NetBeans UI Components
      // using this ExplorerManager will be updated.

    }
When you use Swing components you listen for selection events on each UI Component. So, for instance, you have to add a listener to a JTable or to a JTree or to a JList.
Since we are using a single ExplorerManager to rule different components we have to use the ExplorerManager to listen for selection events. So if the ExplorerManager is related to an OutlineView, and to a ListTableView and to an IconView, you just use a single point to listen for selection events. Much simpler, isn't it?
To listen for selection events you first attach a PropertyChangeListener to the explorer manager, and then listen for the ExplorerManager.PROP_SELECTED_NODES property name, like this:
    // Add a PropertyChangeLister to detect selection
    explorerManager.addPropertyChangeListener(new PropertyChangeListener()    {

      public void propertyChange(PropertyChangeEvent evt) {
        if (evt.getPropertyName().equals(ExplorerManager.PROP_SELECTED_NODES)) {
          setSelectedNodes(explorerManager.getSelectedNodes());
        }
      }
    });
And then you're given an array of selected nodes, that you can use for whatever you like. In our case we get the first selected node and see what abilities the node has, and perform some stuff depending on the abilities of the node (we enable the reload button if the node is reloadable and we set text in a text field if the node has the "HasTextContent" ability).
  /**
   * This method will be invoked whenever a node is selected in the ExplorerManager.
   * @param selectedNodes An array with the selected nodes.
   */
  private void setSelectedNodes(Node[] selectedNodes) {

    if (selectedNodes == null || selectedNodes.length == 0) {
      txtTweet.setText("");
    } else {
      Node firstSelectedNode = selectedNodes[0];
      // If the node "HasTextContent" ability then add the text content to the TextArea
      HasTextContent ctc = firstSelectedNode.getLookup().lookup(HasTextContent.class);
      if (ctc != null) {
        txtTweet.setText(ctc.getText());
      } else {
        txtTweet.setText("No text content");
      }
      // If the node has a "ReloadableNode" ability
      // then enable the cmdReload button, disable otherwise
      ReloadableNode rn = selectedNodes[0].getLookup().lookup(ReloadableNode.class);
      cmdReload.setEnabled(rn != null);
    }
  }
In this section we've quickly seen what an ExplorerManager is, how a single ExplorerManager can handle different NetBeans UI components, how to populate it with data and how to listen to selection events.
Note that we've only covered very basic functionalities of the NetBeans Explorer Manager idiom. There are more advanced concepts that you can exploit in standalone Swing applications, such as how to integrate ExplorerManagers with InputMaps or how to make them participate in NetBeans selection model.
We are now ready to start reviewing some of the most important NetBeans UI components, and how to use them in our Swing applications. But that will be just another section.
| | | |
| 5. The Nodes API (and III) |  | 7. NetBeans UI Components (I) |
blog comments powered by Disqus