| 8. Colorful editors: The Old, The Good and The Young | ||
|---|---|---|
 |  | |
So on last section we ended up with a working black-on-white editor. And we wanted to add some color to our Scheme code. In this section we'll take a look at he current syntax highlighting stuff in the NetBeans Platform. While doing so we'll learn about Editor Settings and module installers. Since this is a complex issue I'm afraid I'll split the stuff in two different entries.

As far as I have seen there are at least three ways to add color to your editors in the NetBeans platform: there is the ugly, old way (the one I will be following here), the standard way (the one explained in the excellent NetBeans Syntax Highlighting Tutorial) and the young one (the one that is currently on the works).
So why all these methods? Well, these different ways to do the same thing show how NetBeans has evolved. The old method is probably not a proper way to do things nowadays (but it has its advantages, as we'll see). The "good way" is a better approach, and it's the current way to add syntax highlighting. And the "young" way is indeed young, still in its infancy, and the NetBeans Team is still polishing it.
The good news is that all these three methods are backwards compatible, so "the old way" to add coloring to text is a subset of "the good way". And "the young" is in turn a superset of the previous one.
Let's give them a quick review, let's understand how they relate to each other and see what the pros and cons of each one are.
- The ugly, old way
The old way to add color to your editors is the one I will be following here. I will be doing so because this mechanism requires only the NetBeans Editor Library and, as a consequence, the method allows you to use the same technique in standalone editors. And having a standalone editor with syntax highlighting is something really interesting for me, so I can add it to my Swing applications!!
As we will see, this old way to do things is just a subset of the method described in the NetBeans Syntax Highlighting Module Tutorial ("The Good"). We can always move to "The Good" mechanism by adding some extra Java and XML files.
- The good
The good way to add color to your editors in the NetBeans Platform is summarized in the NetBeans Syntax Highligthing Module Tutorial. This is basically the same as the old way, but requires some additional classes and files.
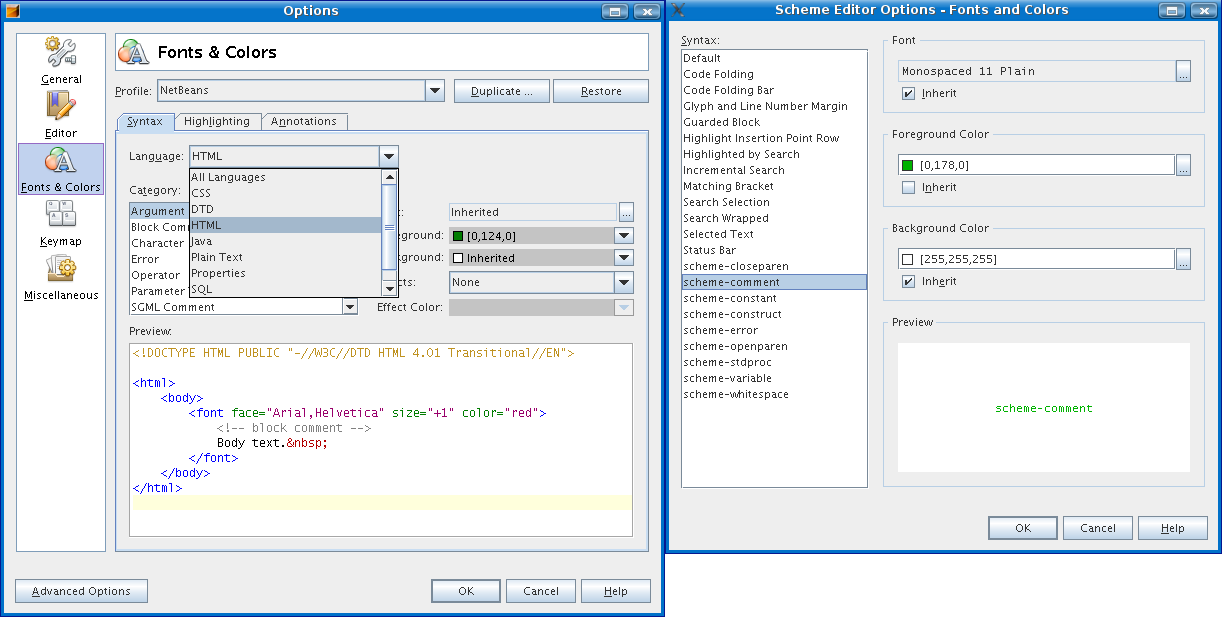
This good way is an evolution over the previous one. The main benefit of this method is that colors can be easily edited by the user using the new Options Dialog. This new Options Dialog presents some sample text to the user (sample text you can define, of course), and allows easy selection of colors for the differents parts of the text. If you are running the NetBeans IDE and choose the "Tools/Options" menu item you'll see what I mean. You have special entries for assigning colors to the editors. This is just cool.
Furthermore, "the good" way allows you to use "color schemes" that represent a combination of colors. NetBeans includes two color schemes: the NetBeans default color scheme and the "City Lights" color scheme (that uses a black background for the editor). The old mechanism does not allow these features, and makes it more difficult for the user to change colors easily.
As you can see the "good mechanism" is much more advanced than the previous one. As a consequence it depends on some more modules, and makes it more difficult to use it on a standalone editor in a Swing application.
So I will follow the old way, and I may add an extra module to "upgrade" the old mechanism into the new one.
- The young
The new way to assign colors to your editors is to use some sort of grammar files, using the Lexer Module. So you can add colors to your favourite languages much more easily. This module has been added to NetBeans CVS Trunk as of 2006-10-04, after passing an exhaustive API review (remember I told you that NetBeans Team was very strict about APIs?). Although this mechanism has been added recently to NetBeans CVS Trunk, the fact is that it has been around for quite a long time. You can see examples (using an old version of the Lexer Module) at the Coyote Project.
The lexer module makes things easier for you, because you can define syntax coloring more easily using text files. Furthermore, it makes it easier to work with files that require different syntaxes (such as JSP files, that require an HTML syntax and a Java syntax). It also makes things even faster, and requires less parsing and overhead than the previous mechanisms.
The lexer module API is still considered unstable, so you are still on time to suggest changes. It's a great time to try it out, experiment with it and give feedback to the NetBeans Team.
So now that we have a high-level overview of these mechanisms, let's go take another high-level overview of what we have to do. Let's review the main classes needed to add coloring to our Scheme editor.
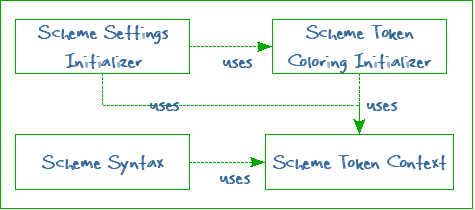
The class diagram at Figure 34, “Classes required to colorify our Scheme editor” shows the classes that we need. Note: if you want to see source code for these, I recommend you visiting the NetBeans Syntax Highlighting Tutorial, many links below point to that tutorial.
- SchemeTokenContext extends TokenContext
TokenContext objects are responsible for defining the types of tokens that appear in the text. For instance, when parsing Scheme documents I think I'll need the following tokens: whitespace, scheme standard procedures, scheme constructs, constants (strings and numbers), variables and comments (and probably some others).
Those tokens are represented by special Java classes called "TokenIDs". These "TokenIDs" contain an integer (a sort of primary key) and a display name (that is also internationalized). Display names use a prefix (such as "scheme-" or "mf-" in the tutorial) to distinguish between different languages, avoiding namespace polution.
You can see some source code from the NetBeans Syntax Highlighting Tutorial. As you can see this is an easy class: you just define what types of tokens you want in your language and create BaseTokenIDs for those.
- SchemeTokenColoringInitializer extends TokenColoringInitializer
TokenColoringInitializers are responsible for assigning colors to tokens (to TokenIDs). Both for on-screen visualization and for printing output as well.
In the NetBeans Syntax Highlighting Tutorial you can see this as an inner class inside the ManifestSettingsInitializer. Source code is here.
- SchemeSettingsInitializer extends SettingsInitializer
SettingsInitializers are responsible for populating options with appropriate settings. These are useful if you have complex set of options, such as those defining fonts and colors.
Building a custom SettingsInitializer is not that difficult. You can use the ManifestSettingsInitializer and use it as a template for your own stuff. That's what I've done with my SchemeSettingsInitializer.
- SchemeSyntax extends Syntax
Syntax objects are responsible for recognizing text as the user types it, returning appropriate TokenIDs (those defined in the associated TokenContext).
Syntax objects are possibly the most difficult thing to build when adding colors to your editor, because there are very tough non-functional requirements for them: they must run fast and generate as little garbage as possible. Because they are run whenever the user modifies the document.
The "old way" and the "good way" to do things use state machines to keep track of the token the user is typing. That's efficient (both in time and space) and is probably the best solution around. The problem is that building them is somewhat difficult.
The "new way" to do things does this operation automatically, using language description files that are easier to build, so you don't have to build the Syntax object by hand, using state machines. I may consider using the new way as soon as it stabilizes.
You declare your custom Syntax object in the Editor Kits. So, for instance, in our SchemeEditorKit we have to return our custom SchemeSyntax, like this:
public class SchemeEditorKit
  extends NbEditorKit
{
  public SchemeEditorKit()
  {
    super();
  }
  public String getContentType()
  {
    return "text/x-scheme"; // NOI18N
  }
  public Syntax createSyntax(Document document)
  {
    return new SchemeSyntax();
  }
}
So, to summarize: adding colors to our Scheme text files works like this: you have to build your custom Syntax object, that translates text to TokenIDs (defined in your TokenContext). Those TokenIDs are in turn translated to colors using the TokenColoringInitializer, which is in turn inserted into the options dialog using a SettingsInitializer.
Not very difficult, but, who invokes the "SettingsInitializer"? We'd like it to be executed when our editor module is initialized, right?
But, how do we execute code when a module is initialized?
That's such an important thing that I've moved that to the next section below.
As we said before, executing code on module initialization is a problem, because code execution is time consuming, and we don't want all the modules to consume time on startup. That would make the whole application startup slow.
But in this case we'll have to add a module installer that inserts our custom editor settings (our custom colors) into the editor options.
But, wait a moment! Why can't we do this with the XML Layer file? Isn't that supposed to be used to register stuff into the NetBeans Platform based application? Why shall we do this by hand and not by adding some more tomato layers to our sandwich?
I am not sure about this, but I assume we have to do things by hand because the editor Settings stuff belongs to the NetBeans Editor Library, and this is a library that can be used outside NetBeans, in standalone Java applications, where no XML Layers exist. And that's why we need a module installer to populate our coloring settings inside our options.
Each NetBeans module may contain a "module installer". This a plain Java class that extends ModuleInstall[5].
The NetBeans IDE contains a wizard that eases creating these Module Installers. The wizard creates this custom class and registers it in the XML Layer file automatically for you.
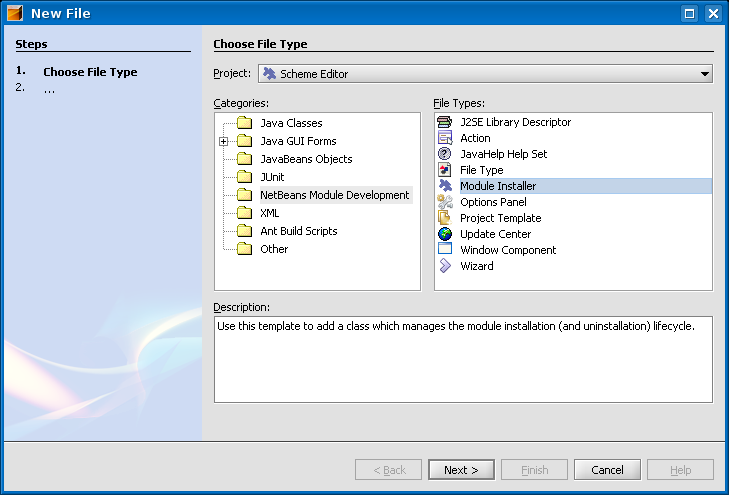
To start this wizard you choose "File/New..." in the main menu and then you select the "Module Installer" option under the "NetBeans Module Development" section, as explained graphically at Figure 35, “Creating a Module Installer, step 1”
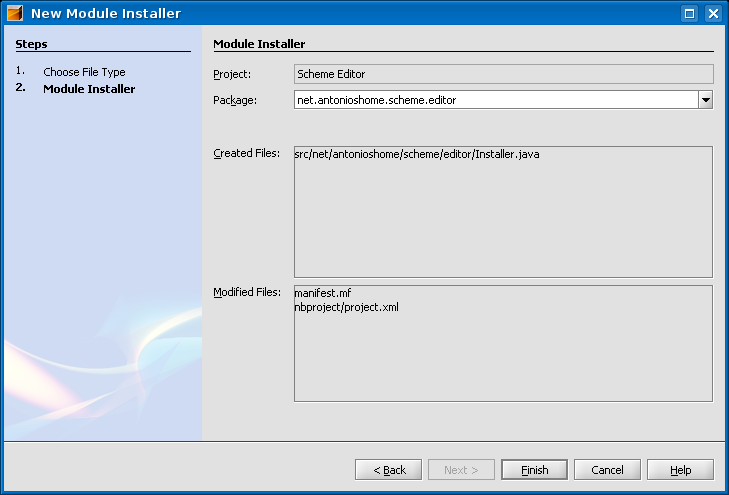
After that you just click "Next" and "Finish" (as you can see in Figure 36, “Creating a Module Installer, step 2”).
Once created you can override different methods of the "ModuleInstall" super class: restored(), uninstalled(), close(), closing() and validate(). Let's take a quick look at these methods.
- restored()
The "restored()" method is the one you'll probably use more often. The NetBeans Platform will invoke the "restored()" method during application startup. It is important to note that this method sums up into application startup time[6], so you must do things as quickly as possible. It is important to note as well that the whole application has not been yet initialized, so you are limited on what you can do. This method is the one we'll be using to inject our editor color settings.
- uninstalled()
The "uninstalled()" method will be invoked by the NetBeans Platform when your module is deactivated (removed) from the running application. We won't be using this, because all the settings we're adding are not permanent.
- closing()
The "closing()" method is invoked on your custom ModuleInstall when NetBeans is about to close. This gives you a chance to check if everything is ok to close. You can stop the close operation by returning "false" from this method. This is a good place to check if all your stuff is saved, and things like that (note that the NetBeans Platform takes care of unsaved buffers in editors for you, though).
- close()
The "close()" method is invoked on your custom ModuleInstall when the application is being closed because all modules have returned "true" from the "closing()" method.
- validate()
Finally the "validate()" method is also invoked during startup (so the application may not be initialized yet). This method allows you to verify that everything is ready for you to run. If you develop commercial applications on top of the NetBeans Platform you can use this method to check for licenses, for instance.
And that's basically it! Inserting our SchemeSettingsInitializer (which in turn populates colors with our SchemeTokenColoringInitializer) may be done in the restored() method, like this:
  package net.antonioshome.scheme.editor;

  import net.antonioshome.scheme.editor.syntax.SchemeSettingsInitializer;
  import org.netbeans.editor.Settings;
  import org.openide.modules.ModuleInstall;

  public class Installer extends ModuleInstall
  {
    public void restored()
    {
      Settings.addInitializer( new SchemeSettingsInitializer() );
    }
  }
Before finishing this section let me remind you that the good way to add colors to your NetBeans editors is explained in the NetBeans Syntax Highlighting Tutorial. Following that tutorial is probably your best option: remember that (since the old way is a subset of it) you'll also be doing things "the old way".
On the next section (on the works) I'll take a look at the "Syntax" object, and explain how I've defined it for the Scheme language.
| | | |
| 7. Scheme Editor Options |  | 9. Adding Syntax Support |
blog comments powered by Disqus
