| 7. Scheme Editor Options | ||
|---|---|---|
 |  | |
In the last section we ended up with a SchemeEditorKit that did not work properly. We were missing some key bindings and some syntax highlighting.
In this section we'll add some options to the Scheme editor. We'll set the key bindings, the caret blink rate, the fonts, the number of spaces per tab, a default indentation engine, lots of much more options and even an useless option (just to see how things work). We'll also have to persist those options, so that the user doesn't have to reenter them when he starts again the Scheme IDE.
And, you know what? We'll do all that with a single class, a specially cooked XML file and another entry in our sandwich layer. It's so easy that I'm ashamed I haven't looked into this stuff earlier! It would have saved me lots of time!

The NetBeans Platform includes an Options API that handles the so called System Options. These are properties that you set in a module so that the user can modify them easily through the Options Dialog. These options are automatically persisted on disk, so you don't have to worry about storing them yourself. This is something similar the Java Preferences API, but much more powerful.
As we will see, the Options API is so powerful that you can add your custom properties to a Java Bean you're defining, and have all those properties automagically persisted for you. The fact is that the NetBeans Platform uses Java Bean Introspection to seek for those properties.
In fact the NetBeans team has been always concerned about standards, and this introspection mechanism follows the Java Beans Specification. This basically means that you can use BeanInfos to customize how your properties are edited (this is, you could add custom property editors to edit them), or to specify descriptions for those options.
I won't be covering BeanInfos at the moment (I don't think I really need them now). If you think you need them then you should probably go take a look at the Java Editor Options package, the Java Editor Options has a powerful BeanInfo you can learn from.
The NetBeans Editor Module uses the Options API to handle editor-related settings, such as the number of spaces per tab, the caret blink rate, the abbreviations, the font size, the indentation engine to use, the color of the caret, the key bindings, different colors and many, many other settings. It does so using a special class, called "BaseOptions" that is included in the Editor Module.
Of course it's important to associate at least a default set of options to an editor, otherwise you won't be able to work with it (you won't have key bindings, for instance!). That's the problem we were facing in the previous section: our SchemeEditorKit had no options at all (not even default ones) so the NetBeans Platform was confused and didn't know how to properly render our SchemeEditorKit, resulting in an unusable editor.
In previous sections I suggested that you should be doing different things in different modules. This makes your application much more flexible. But, should we place the options in a new module of its own? Or should we just add the single class inside the Scheme Editor Module?
I could build a separate module just for options (following my self advice of making tiny modules) but, why would anyone want a Scheme Editor Module with a SchemeEditorKit that does not work? Wouldn't it be better to include the Scheme editor options stuff inside the Scheme Editor Module, so that everything works correctly?
Yes. I think it's a better idea. So let's place all the stuff inside the Scheme Editor Module. But let's try to separate it from other classes. Let's store the new classes and files inside the "net.antonioshome.scheme.editor.options" package.
So let's build a new package "net.antonioshome.scheme.editor.options" and let's create a new class, call it SchemeEditorOptions.java, and make it extend the BaseOptions in the NetBeans Editor Module.
As we said before, the "BaseOptions" class is a derivative of the "SystemOptions" class (in the "Options API") that contains predefined options for editors (key bindings, caret blink rate, and many others). Base Options is a Java Bean with properties for editors. It has setters and getters. There's a "setCaretBlinkRate(int)" method, for instance, that sets the caret blink rate. If we wanted to add another property to
Since BaseOptions (and SchemeEditorOptions) are JavaBeans, we can add new properties of our liking. And these will be persisted to disk and restored when the Scheme IDE starts up. This is cool!
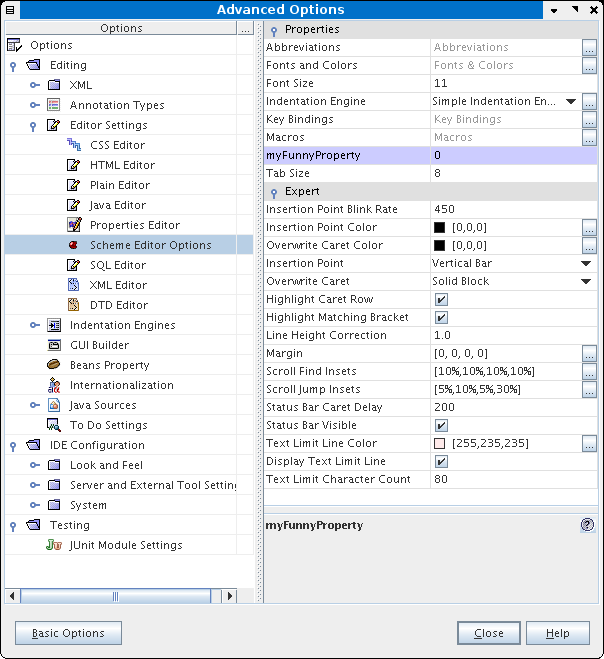
Just for fun, and to see how things work, I've added a "MyFunnyProperty" to the SchemeEditorOptions class. I don't know yet what sort of options I'll have to add to an Scheme editor, but I now know where I should be storing them!
The "SchemeEditorOptions.java" class, that we have to create, looks something like this:
package net.antonioshome.scheme.editor.options;
import org.netbeans.module.editor.options.BaseOptions;
/**
* SchemeEditorOptions is responsible for handling Scheme options.
* @author $Author: $ Antonio Vieiro (antonio@antonioshome.net)
* @version $Revision: $
*/
public class SchemeEditorOptions
extends org.netbeans.modules.editor.options.BaseOptions
{
/** A name for these options */
public static String SCHEME_PREFIX= "scheme"; // NOI18N  /** A default constructor */
public SchemeEditorOptions()
{
super( SchemeEditorKit.class, SCHEME_PREFIX );
/** A default constructor */
public SchemeEditorOptions()
{
super( SchemeEditorKit.class, SCHEME_PREFIX );  // Just for fun: modify a property in the base class ;-)
setCaretBlinkRate( 450 );
}
/** A funny property */
private int myFunnyProperty;
// Just for fun: modify a property in the base class ;-)
setCaretBlinkRate( 450 );
}
/** A funny property */
private int myFunnyProperty;  public void setMyFunnyProperty( int aValue )
  {
myFunnyProperty = aValue;
}
public int getMyFunnyProperty()
{
myFunnyProperty = aValue;
}
public int getMyFunnyProperty()  {
return myFunnyProperty;
}
/**
* This is used to retrieve display names to
* easy internationalization of options.
*/
protected String getString(String key)
{
return myFunnyProperty;
}
/**
* This is used to retrieve display names to
* easy internationalization of options.
*/
protected String getString(String key)  {
try
{
return NbBundle.getMessage(SchemeEditorOptions.class, key);
}
catch (MissingResourceException e)
{
return super.getString(key);
}
}
}
{
try
{
return NbBundle.getMessage(SchemeEditorOptions.class, key);
}
catch (MissingResourceException e)
{
return super.getString(key);
}
}
}
Let's review what this code does.
Options are stored on disk in a centralized place. In order to separate options from different modules, each module uses a specific name to differentiate its options from others. That way an editor cannot override by accident options from another editor. | |
In the constructor we associate the SchemeEditorKit class with the prefix we have chosen for Scheme options. That way our SchemeEditorKit (that we created in the previous section) will be initialized with all those default options for key bindings, caret blink rates and the such. The "BaseOptions" constructor will associate default key bindings, default carent blink rates, default colors and fonts, and lots of other different options. So we need no extra coding, we have all this bunch of functionality with just a single line of code. Anyway you can set your preferred values of some properties there, too. I've modified the caret blink rate, for instance, to 450 milliseconds. Just for fun ;-). | |
You can add custom properties of your liking too. These will be persisted by the options subsystem automatically for you. The fact is that NetBeans performs some Java Beans Introspection for you, and detects all the properties you add to your options. These properties will then be persisted and presented to the user in the "Options Dialog", as we'll see later. Java Beans Introspection is a quite common task in NetBeans, and provides a quite powerful mechanism in different modules. Properties can be simple types or complex types of your liking. [3] | |
The "getString" method is responsible for returning localized strings for the user to see. The options API will invoke this method to retrieve display names of stuff to be presented to the user in the Advanced Options Dialog. What we do in this method is to use a NbBundle and to ease internationalization. The first argument to the "getMessage" method is a class used to locate a "Bundle.properties" file, which in turn is a resource bundle for internationalization. Note that the NbBundle class is located inside the utilities library, and that you'll have to add a dependency to that. The Bundle.properties file, that you have to place near the "SchemeEditorOptions.java" file, contains just a single entry used to give a display name to the options. The code looks like this:
# Resource Bundle file for Scheme Editor Options.
OPTIONS_scheme=Scheme Editor Options
The key "OPTIONS_scheme" is fixed by the options module, and is used to identify the set of options for our Scheme Editor (note that the "scheme" part is due to the SCHEME_PREFIX above). |
Of course we'll have to tell the NetBeans Platform that we have created this class, and that we want it to be executed so as to get those default options in our EditorKit. We have to register our custom SchemeEditorOptions within the platform. Any idea on how to do it?
No? Really? Think of it again...
Yep. We'll be registering it with... the XML Layer File! Of course! Let's add another layer of options to our sandwich.
Registering options with the sandwich file is performed in two steps. First we'll add an entry pointing to an external XML file, and then we'll have to write that XML file in a special format, obeying a special DTD just for options.
This may seem complicated, but it's again a piece of cake once you know what you're doing. Just think of all the hassle we're avoiding (persistence, for instance). Isn't it worth the effort? I think so!
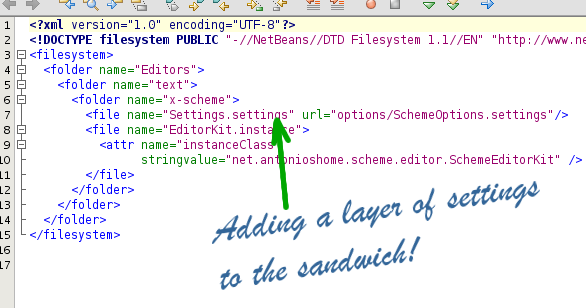
The entry to add to the XML Layer File is a "file" entry named "Settings.settings" (this name is fixed by the platform). The "file" entry has an "url" attribute pointing to our external XML file for options. Since URLs are relative to the location of the XML Layer File, we'll set the value of the "url" attribute to "options/SchemeEditorOptions.settings", and will create an empty XML file named "SchemeEditorOptions.settings" under the "net.antonioshome.scheme.editors.options" package.
So to summarize, the XML layer file has a new entry (located under the "Editors/text/x-scheme" folder) that looks like Figure 30, “Registering editor options in the XML Layer”.
The external file ("SchemeEditorOptions.settings") is much more involved than the XML Layer file, and looks like this:
<?xml version="1.0"?>
<!DOCTYPE settings PUBLIC "-//NetBeans//DTD Session settings 1.0//EN"
"http://www.netbeans.org/dtds/sessionsettings-1_0.dtd">
<settings version="1.0">
  <module name="net.antonioshome.scheme.editor"/>
  <instanceof class="java.io.Externalizable"/>
  <instanceof class="org.openide.util.SharedClassObject"/>
  <instanceof class="java.beans.beancontext.BeanContextProxy"/>
  <instanceof class="java.io.Serializable"/>
  <instanceof class="org.openide.options.SystemOption"/>
  <instanceof class="org.netbeans.modules.editor.options.OptionSupport"/>
  <instanceof class="org.netbeans.modules.editor.options.BaseOptions"/>
  <instance class="net.antonioshome.scheme.editor.options.SchemeEditorOptions"/>
</settings>
This "settings" file specifies settings for the module "net.antonioshome.scheme.editor" (see the "module" element at the beginning?). And then it specifies all the class hierarchy until our "net.antonioshome.scheme.editor.SchemeEditorOptions" file. Note that this is a Serializable class (because we will be persisting data from SchemeEditorOptions to disk!)
I assume[4] that specifying the class hierarchy explicitly is needed in order to correctly deserialize the class. After all deserializing the class will require loading classes from different modules and libraries (the libraries containing org.openide.util, and org.openide.options and the editor module and the Scheme editor module). Specifying them explicitly avoids the NetBeans Platform having to load too many modules: the platform will be able to load only those modules required to deserialize our options. This, of course, is better for performance!
Once we've updated our XML Layer file we, of course, have to wash our hands. This is, validate it. Right-click on the editor and select "XML Validate" in the popup menu
And we're almost ready to run our editor. You can run the SCHEMESUITE project now, but you won't yet be able to correctly edit Scheme files. We need another little step: we need to recognize the syntax of Scheme files.
Since I don't want to make this section too long I think it's better to introduce some plain syntax, and dedicate the whole next section (still on the frying pan ;-)) to syntax highlighting.
A plain syntax just recognices words. And words are printed on black on white. Just like plain text files. That's why it's called plain, after all!.
Adding a plain syntax is just a piece of cake. You'll have to add the following method to the SchemeEditorKit:
public Syntax createSyntax(Document document)
{
  return new PlainSyntax();
}
And, of course, add a dependency to the module containing the PlainSyntax class using the steps we talked about earlier at Section 6.4, “Adding dependencies to other modules”. PlainSyntax is useful to have a quick and dirty syntax for editors, or for editors that do not need to have syntax highlighting. Indeed a handy class.
In this section we had a snack with NetBeans options for editors, we introduced the XML file for settings and we added a plain syntax for Scheme files. Our editor should be working now, and we should be able to open and save Scheme files.
In the next section we'll add some color to those ugly black-on-white Scheme files, adding special colors for Scheme library procedures and constructs. That's going to be fun all the way long. Keep tuned for some colorful Scheme!
| | | |
| 6. Adding an editor for Scheme files |  | 8. Colorful editors: The Old, The Good and The Young |
blog comments powered by Disqus
