| 3. Adding support for Scheme files | ||
|---|---|---|
 |  | |
If we are going to build a Scheme IDE we do need to detect Scheme file types, right? This section explains how to add a new file type and, by doing so, introduces some basic module building functionality in the NetBeans IDE.
So let's get started. Open your NetBeans IDE and select File/New Project in the menu. You'll get lots of options there. One of them is "NetBeans Plug-in Modules". Click there. You'll see three options:
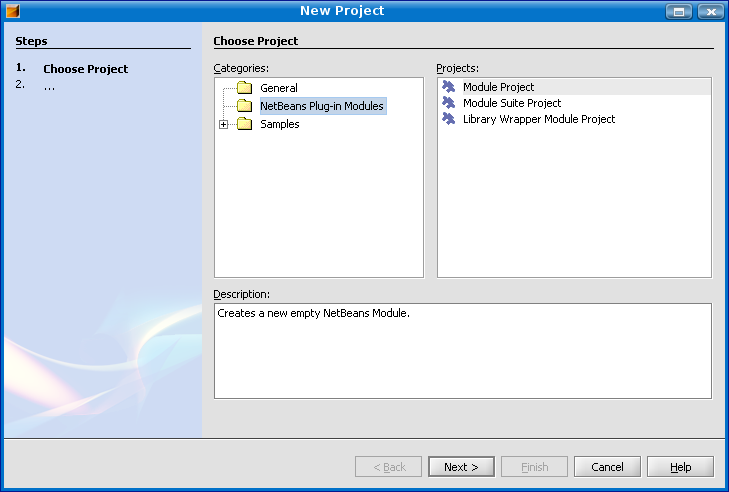
- Module Project
- Module Suite Project
- Library Wrapper Module Project
Now you'll probably be confused now, right? Well, so was I. The fact is that it's not that difficult once you learn what the differences between these types of modules is. Let's see it.
You use this sort of thing if you want to wrap a library for other modules to use. Note that this library is not going to be added to the resulting application for the user to use. On the contrary: this library is only for internal use in your application.
For instance, we will use this type of module to wrap the SISC Scheme interpreter inside our application, in a future section.
Module Suites are used to deliver a set of plain modules as a deployment unit. You can "run" a module suite, and all the modules it contains will automatically be deployed in the NetBeans Platform.
Module Suites can also be used to build a standalone application on top of the NetBeans Platform. The application will contain the modules contained in the suite (as well as any other NetBeans modules that your modules depend on). When used to build standalone applications, the Module Suites can be configured to present a custom splash screen, for instance.
While we're building the Scheme IDE, we'll be using a module suite to hold all our other modules. When finished we'll customize it with a nice splash screen.
This is a plain NetBeans module. It can work as a standalone module or it can be a part of a Module Suite Project.
I don't really like standalone NetBeans modules. I think all modules should live within a Module Suite Project, that way you can later on add new dependent modules easily (or even better: build a standalone application).
Plain modules are used to deliver a small amount of functionality to your applications. You can build a module to detect file types, for instance, and another module to provide basic editor support, and another one to get syntax highlighting working.
It's always a good idea to have many different small modules than having a bigger one. If you have smaller modules, that provide small functionality, it's always easier to manage dependencies between them. And, if you have smaller modules, you can enable and disable some modules (those that contains bugs, for instance) and run your application with a smaller set of modules (without syntax highlighting, for instance). Going small is probably a good idea when developing on top of the NetBeans Platform.
![[Note]](images/note.png) | Prefer smaller modules to bigger ones |
|---|---|
If you're building a complex application then use a Module Suite to hold many different smaller modules. By splitting your functionality in smaller modules you can better manage complexity, dependencies and robustness of your applications. |
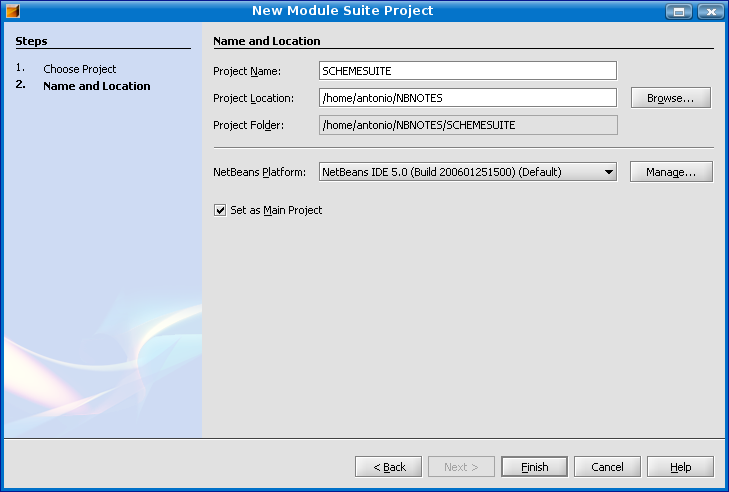
So let's choose a Module Suite Project that will hold our modules. That way we can later on build a standalone application easily.
To build a Module Suite we just have to select a project name. I like using capital letters for these, so I'll call that SCHEMESUITE. It will use the NetBeans Platform that the NetBeans IDE itself is using. After entering that info, just press "Finish" and you're all set.
You'll see a new project with two folders, "Modules" and "Important Files". The "Modules" folder will contain all the modules we'll be adding to the Module Suite. The "Important Files" folder contains, well, important files! The files in this directory are extremely important, because they hold information about our Module Suite. You don't really want to mess with them (unless you know what you're doing!). So let's forget about these at the moment, we'll go into them as soon as needed.
The really important thing to know about Module Suites is that you can configure a suite by choosing the "Properties" menu in the popup menu that appears if you right-click on the Module Suite. Again we'll configure the suite later on, so let's wait a little bit until then.
Once the suite is in place we can start adding modules to it. Let's start with an important module: the one that will add file-type detection for our Scheme programs. Let's do that now.
So let's choose "File/New Project" from the NetBeans IDE menubar and let's select that "Module Project" in the "NetBeans Plug-in Modules" section.
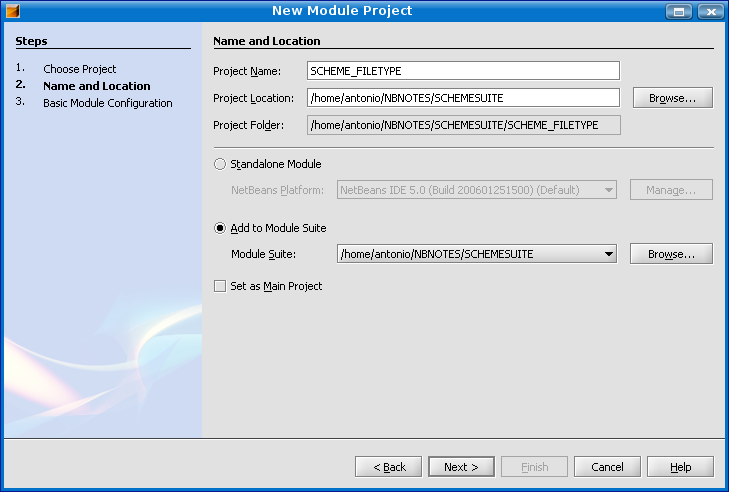
I choose SCHEME_FILETYPE as the module name (I like capital letters for these). As you can see the module is automatically inserted into the Module Suite we have just created in the previous section.
After clicking "Next" we are prompted to enter some basic configuration details:
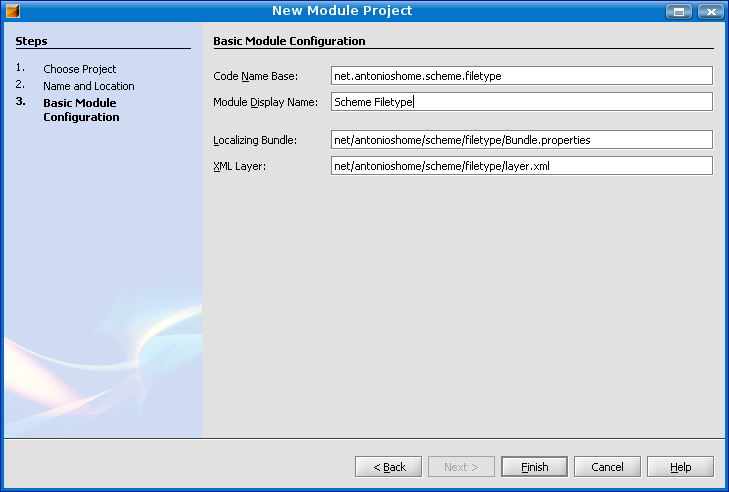
- Code Name Base
This is a name you use to identify your module inside the NetBeans Platform. It looks like a Java package name, so you can use your preferred naming conventions for Java package names to name it. I, for instance, use my Internet domain (net.antonioshome) and then add some name for my module suite (let's say "scheme") and finally some name that identifies the module (let's say "filetype" for this module, because it is going to be used to identify Scheme file types).
Note that while you're writing your code name base some stuff changes as well. Mainly the location of your localizing bundle and your layer file (more on this later).
- Module Display Name
This the display name of your module. This string will be used to show your module inside the NetBeans Module Manager, for instance. I usually choose names that are clear to me. In this case I've chosen "Scheme Filetype".
- Localizing bundle and XML Layer
These are the locations of important files for the module. We'll see them in detail later on. I always accept the defaults here.
So we now have a Module Suite Project called "SCHEMESUITE" that contains a plain Module called "Scheme Filetype". Let's take a look at all this, and understand the basic file structure of our recently created projects. After all we'll be working with that structure all the time, so it's better to understand it now. What you have now in your IDE should be something similar to Figure 10, “Structure of module suites and modules”.
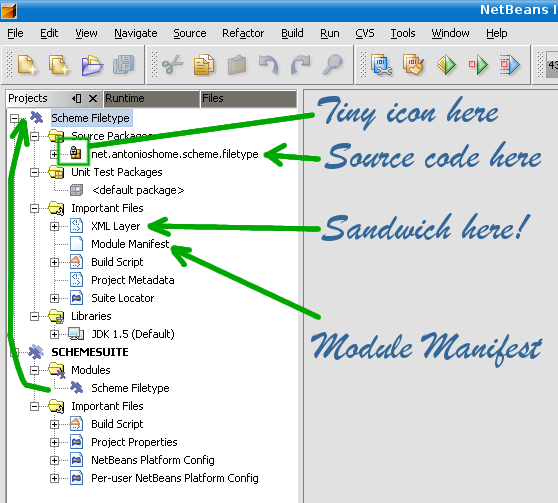
There're some interesting points to understand.
The "Scheme Filetype" module is contained within the "SCHEMESUITE". You can see how the NetBeans IDE has included it automatically for us under the "Modules" folder of our Module Suite.
See the "Source Packages" folder? Well, that's the place where our Java packages are going to reside. We'll be adding Java packages and classes in there. There's also a "Unit Test Packages" folder below, that's the place where NetBeans places our unit tests.
Notice that little tiny icon before the package name? It shows a "locked" stuff on top of the package icon, right? (Yes, I agree: this is very small, should be bigger). That small "lock" icon means that the "net.antonioshome.scheme.filetype" Java package is not public. This is, that no other modules can work with the classes under that package.
There's also a "Module Manifest" file there. This is a configuration file containing different important configuration data (that's why it's under the "Important Files" folder, because it's important. If it were not important then I imagine it should reside under the "Non Important Files", right? Well, but there's no "Non Important Files" folder, so it should be there anyway. Oh, I'm getting confused. Don't worry at the moment about this file. Just remember that is important and that you should not modify it directly, unless you want to do a big mess).
There's also a file called "XML Layer". This is important also because it's under the "Important Files" folder :-).
I'll call this the "Sandwich file". It's so important that the next section will be dedicated only to sandwiches.
Yes, I know. I've entered into details and I haven't added support for Scheme file types yet. I beg your pardon. Let's get into that now.
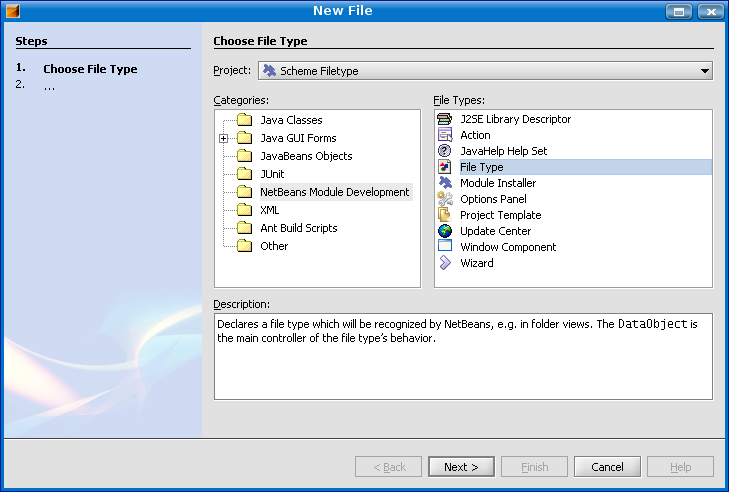
Right-click on the "Scheme Filetype" plain module, and select the "New/File/Folder..." menu. After that, in the wizard that appears, select the "NetBeans Module Development" entry. You should see something similar to Figure 11, “New File Wizard”.
As you can see there're wizards for creating "J2SE Library Descriptors", "Actions", "Java Help Sets", "File Types", "Module Installers", "Options Panel" and many other fancy things. We'll go through many of these later on as we enhance our Scheme IDE. At the moment, and since we want to add support for Scheme files, we select the "File Type" option and click "Next".
After pressing next you'll see something similar to Figure 12, “New File Type Wizard”. The NetBeans platform recognizes files by extension. XML files, of course, have usually the same ".xml" extension, so for XML files the NetBeans Platform uses another technique: it detects the type of XML files by the namespace they use, and not by extension.

Scheme files tend to use the ".scm" file extension. Let's use that. The "MIME Type" for Scheme files can be either "text/x-scheme" or "text/x-script.scheme". I prefer the first one. Let's choose "text/x-scheme" for the MIME type. Note that you can enter different extensions here, see the help page for this wizard for more details (yes, the IDE contains interesting help dialogs, that we seldom use, right? That's sad, isn't it?).
Now, let's keep moving. Click "Next" to proceed with the next step in this wizard. You'll be presented a dialog similar to Figure 13, “New File Type (second step)”. Of course a file type should have an icon. This icon will be used for Scheme files in our IDE. I've chosen a lambda letter for these (well, of course!).

In this dialog you also have to enter to a "Class Name Prefix". I've entered "Scheme" in there (of course, again ;-)). This prefix is used as the prefix of all generated classes. Yes, this wizard generates lots of little tiny classes responsible for adding the support for Scheme file types in our future IDE. Among the generated classes and files, three are very important: the SchemeDataObject class, the SchemeDataNode class and the SchemeTemplate.scm file. We'll go through these in future sections.
Note, as well, that the wizard will modify different files under the "Important Files" folder. Among the modified files is our misterious "Sandwich file" (the layer.xml file). Note as well that the module manifest (the manifest.mf file) is going to be modified as well.
After clicking "Finish" we're all set! We now have an IDE that recognizes Scheme file types. This easy! Let's try it out! I cannot resist!
So let's see how this works. First of all let's modify the "SchemeTemplate.scm" file. This is used as a template that will be used whenever you want to open a new Scheme file. Let's open this "SchemeTemplate.scm" file and write a small Scheme program:
;;
;; A sample Scheme program
;;

(display (sqrt -1))
Now, after saving this file, let's click the "Run" button. You'll see that the NetBeans Platform logo appears, and that a new NetBeans IDE is launched.
This is fantastic, isn't it? You can run the NetBeans IDE within your own NetBeans IDE!!
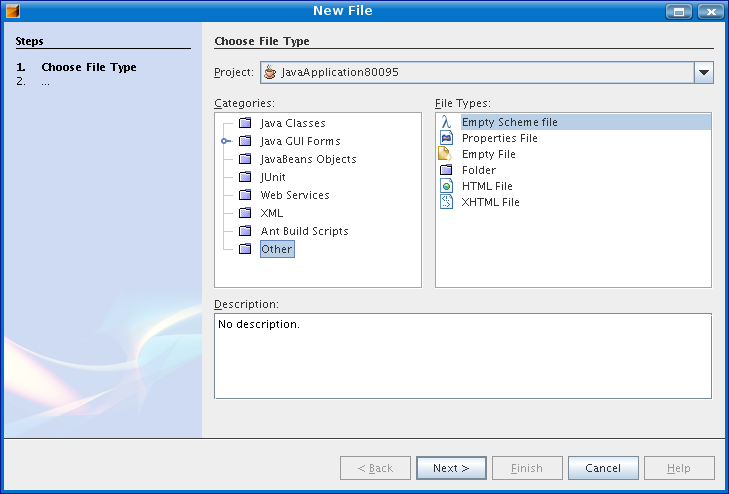
Now, in the new IDE, create a new project and then right-click on the project and select the "New/File/Folder..." menu. You'll have the list of available data types, including our Scheme filetype. If you create an empty Scheme file then you'll get the contents with the template above. So that's it: we've already added a Scheme filetype to our IDE!!
You may have noticed that it has taken some time to launch the new IDE. That's because we're running our module suite in the NetBeans Platform (that the IDE itself is using). And this platform contains tons of modules... that we may not need at all.
So it may be a good idea to disable some of the modules in that platform, so that we don't have to load them at startup time. This will make things faster. Let's do that. Let's disable all those fancy J2EE modules that we are not going to use: after all this is an IDE for Scheme, not for J2EE!
Close the newly opened IDE and go back to your usual IDE. Right click on the SCHEMESUITE and select the "Properties" menu. You will see something similar to Figure 15, “Disabling J2EE support on the NetBeans Platform”.
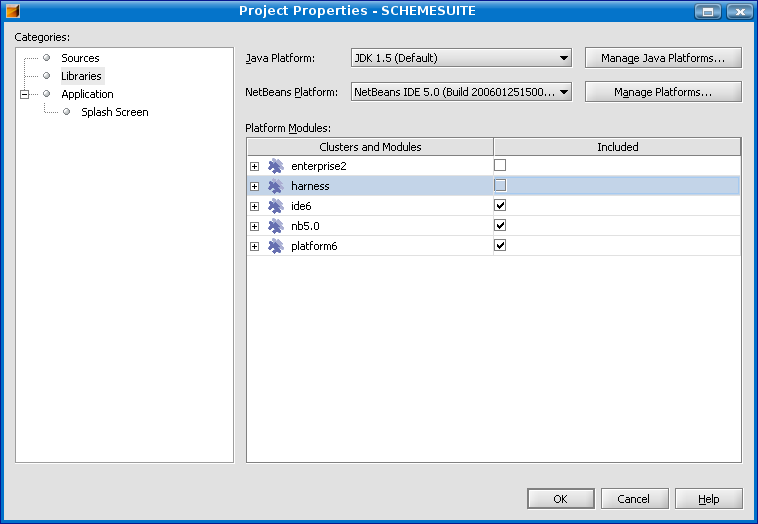
As you can see, the platform is composed of several "clusters" (groups of modules). Let's remove all the "enterprise2" cluster, by disabling its inclusion in the resulting IDE. That'll save us a little bit of startup time.
Now, run the SCHEMESUITE Module Suite again. You'll notice some speedup at startup. The newly opened IDE will still contain our Scheme Filetype module (of course!) but it won't contain support for building J2EE applications.
We'll see in future versions how to better configure our SCHEMESUITE. At the moment I think it's better to just disable the "enterprise2" cluster, since we won't be using it right now. Let's keep the other clusters because we may need modules in those.
You can experiment yourself by disabling several different clusters or different modules. You'll note that the NetBeans IDE warns you if you disable a module that is needed by different other modules (that's why it's important to explicitly declare dependencies between them, see?). Experiment with cluster and module inclusion as much as you want, and see how module inclusion affects to the resulting IDE. Note that if you disable certain modules on which our Scheme Filetype module depends, then our project won't compile any longer, and you'll have to reinclude the offending module again.
This has been a long section. In this section we've seen what the different types of modules are (Library Wrappers, Module Suites and plain Modules), what they mean. We have created a Scheme Module Suite that contains a simple Scheme Filetype module, and we have added support for Scheme file types in the resulting application.
What next? Mmm. Let me think... What about having some sandwiches?
| | | |
| 2. NetBeans Module System Basics |  | 4. Sandwiches!! (XML Layer Files) |
blog comments powered by Disqus
