| 6. Adding an editor for Scheme files | ||
|---|---|---|
 |  | |
In this section we'll add an editor for Scheme files to our Scheme IDE. While doing so we will learn how to manage dependencies between modules, and will start modifying the XML Layer file. In order not to make this section too big we'll add syntax highlighting in another section.
I could add the editor for Scheme files inside our existing "Scheme Filetype" module. But I won't do that. As I explained before, building many small modules is much better than building big fat modules: smaller modules give you more flexibility, give you more cohesion, and allow you to enable and disable buggy features easily. The smaller the module the better.
So let's add another module to our SCHEMESUITE Module Suite. Select the "File/New Project" menu in the NetBeans IDE and then choose "NetBeans Plug-in Modules/Module Project".
Let's use SCHEMEEDITOR as the "Project Name" (yes, I like capital letters for these), and let's make sure we're adding the module into our SCHEMESUITE Module Suite.
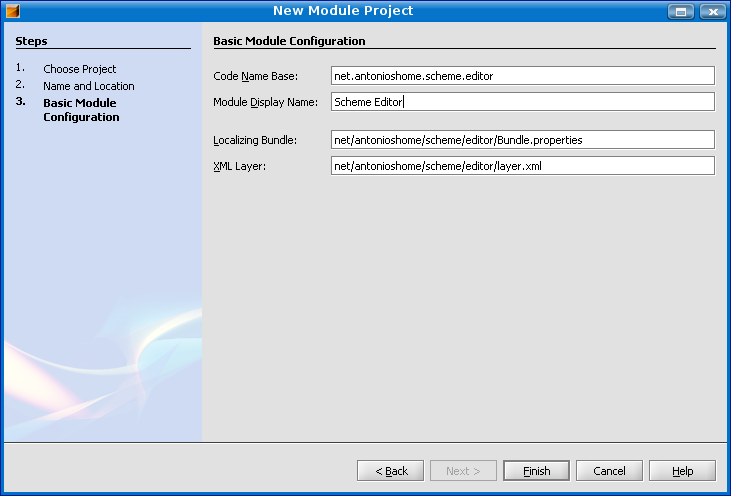
Once you're done click "Next" and you should be seeing something similar to Figure 22, “Adding a new editor module”. Note , again, that I use the same naming convention as with the previous module: my domain name (net.antonioshome), a common string for all modules in the suite (scheme) and a name for the module (editor).
Now that we're all set with this brand new module let's add an editor for Scheme files. What we want to do is to add a custom EditorKit (let's call it SchemeEditorKit) and have it associated with our "text/x-scheme" mime type. That's the standard way to do it using the Swing Text API.
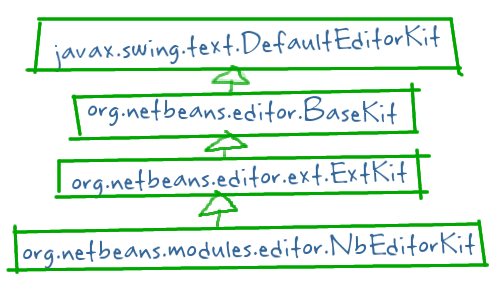
But, hold down just a minute: NetBeans includes some delicious EditorKits, which bring lots of cool features to Swing's plain EditorKits. NetBeans EditorKits come in different flavors, with a different set of features. You have the following types of EditorKits: Figure 23, “Types of EditorKits”
That may seem confusing at a first glance, but the fact is that is extremely interesting and powerful! Let's see some cool features of all these EditorKits:
- Different packages!
The first thing we observe is that some of the NetBeans Editor Kits live in the "org.netbeans.editor" package. This is so because they can run outside the NetBeans IDE. This is: you can use those as an open-source, standalone, powerful syntax highlighting enabled EditorKits, in your preferred Swing applications. I may post a blog entry on how to do that in the future. So remember that the "BaseKit" and "ExtKit" may be available as separate libraries.
And finally the more specialized EditorKit, the NbEditorKit, is inside an org.netbeans.module.editor package, meaning that it's contained inside the NetBeans Editor module. As we'll see later that means that we'll have to add a dependency to that module if we want to use such an EditorKit.
- Line oriented!
The "BaseKit" EditorKit from NetBeans returns a customized version of Swing's Text Document that is line oriented. This makes the BaseKit a very interesting EditorKit for IDEs, because it makes things faster. Furthermore, BaseKit has been around for such a long time that it has been deeply tested. So the BaseKit alone, with line-oriented Documents, is just a great piece of software. It also adds syntax support, so as to allow for syntax highlighting.
- Actions!
The "BaseKit" adds a lot of Action to your text-editing capabilities. There're are predefined actions for many editing operations: deleting until the end of the line, from the beginning of the line, enabling macro recording, go to the next word, to the previous one, and many, many others.
- Custom UIs!
NetBeans Editor Kits use also a specialized EditorUI that is responsible for visualizing the editor. It also includes customized versions of all sort of specialized Views, that use the Flyweight Pattern to speed up stuff. As a result the NetBeans Editor is a complex, high performance, nicely designed editor that you can include in your Java software. It's so cool that it can include toolbars, popup menus, a margin for line numbers and code folding and even a status bar: a delicious piece of software, indeed.
Of course there's much more inside the NetBeans Editors, but I think this is good enough to give a rough idea of what's hidden in there. And of course nice enough for our Scheme IDE. So let's go back to our goal: build a SchemeEditorKit for Scheme files.
Let's get started: let's right-click on our package and let's say we want to add a new Java class, and let's call it SchemeEditorKit.
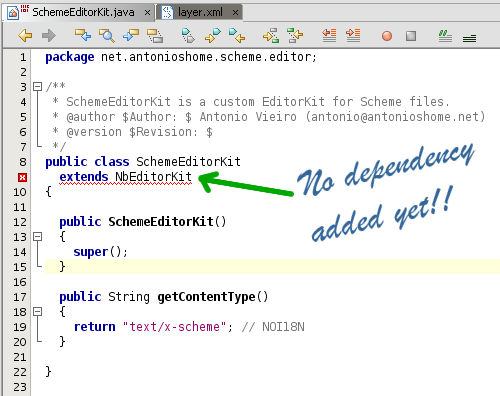
Let's make this class extend "NbEditorKit" (so that we have all the benefits of BaseKits and ExtKits), and have a "getContentType()" method that returns the text "x/text-scheme", the MIME type of our scheme files. You should be seeing something similar to Figure 24, “SchemeEditorKit.java”.
Note that there's an error marked in red, because the "NbEditorKit" class cannot be found. This is so because we have not added the NbEditorKit class to the set of libraries of our module. The "NbEditorKit" class lives in a Public API inside one of the NetBeans provided modules. We must declare a dependency between our module (the Scheme Editor module) and whatever module owns that class. This is an important idiom while developing with the NetBeans Platform:
You need a class that you cannot import, because there's not a dependency between the module you're building and the module where the class resides.
You declare a dependency between the module you're building and the module holding the class. You probably want to know which module holds that class. This is done with a NetBeans wizard very easily, as we'll see immediately.
Once the dependency is done you can import and use that class (you usually do that pressing Alt+Shift+F, or choosing the "Source/Fix Imports" menu item to fix imports automagically).
All that may seem very complicated, but the fact is that it's a piece of cake! Let's see how to find which module holds the required NbEditorKit and how to add a depencency with it.
Right-click on the "Scheme Editor" module and select the "Properties" menu item. Then click the "Properties" category. You should be seeing something similar to Figure 25, “No declared dependencies”
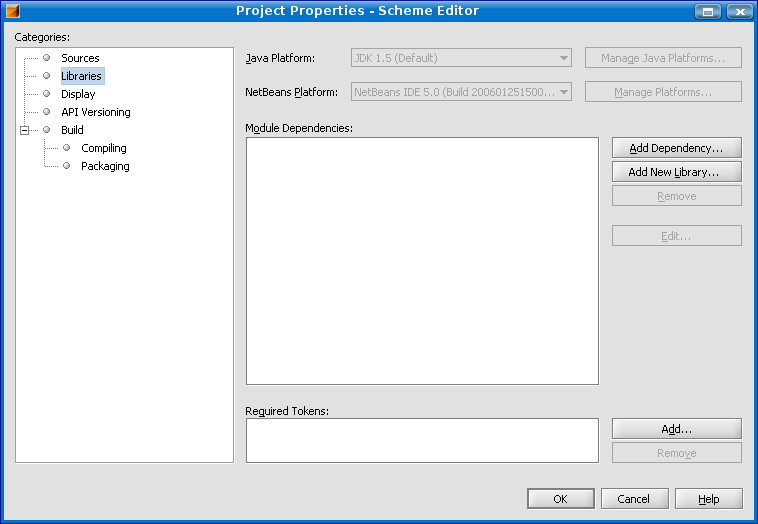
As you can see there're two main buttons there:
- Add New Library
This adds a new library to our module. Of course this will be a Library Wrapper Module, as we explained a few sections ago. This button is used to add dependencies between our module and third-party, non-NetBeans software. You could use this to wrap a third-party library, such as the SISC Scheme interpreter, for instance. We don't need that now.
- Add Dependency
This button adds a dependency between our module and either another module of ours, or a module existing within the NetBeans Platform. This is the one we want to choose.
So we need the second button: the "Add Dependency" button, because we want to find which NetBeans module owns the NbEditorKit class. Let's click on it.

Once you click on it you should have a dialog similar to Figure 26, “Which module owns NbEditorKit?”. There's a "Filter" text field that you can use to find stuff. You can type lots of stuff there. Let's find out which module holds our NbEditorKit class. If you type the class name there ("NbEditorKit") a single module will be selected: the "editor" module. Note that there's a "Description" text there that shows further information about the module. All NetBeans modules in the NetBeans IDE are shown, as well as your own modules in your suite.
Once our "editor" module is selected let's press "OK". This will make our Scheme Editor Module depend on the NetBeans Editor module. That's it! As you can see, adding dependencies to modules is just a piece of cake, isn't it?
Well, not quite. If you try to build the project you'll see that the compiler complains about not finding the "ExtKit" class (that is the super class of NbEditorKit). This is so because, as we explained before, dependencies are not transitive! So, again, we'll have to go find out which module owns "ExtKit". The process is the same as above: Project/Properties/Libraries/Add Dependency, but now looking for the module that owns ExtKit. This is left as an exercise to you. Hint: only one more dependency is needed. (Ok, if you cannot find your way out then look here[1]).
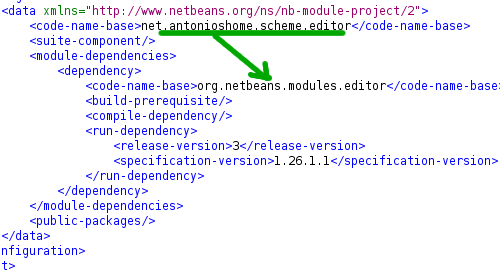
Dependencies are stored explicitly in a file in your project. If you open the "Important Files" folder and then the "Project Metadata" you can see it for yourself. This is an XML file specifying (among other things) what other modules you're dependent on. Note that there're different types of depencencies (compile-dependency and runtime-dependency) and that you can specify the release version and specification version of the modules you depend on. You can see an screenshot of this important file at Figure 27, “Detail of the Project Metadata file”. We'll go deeper into this file afterwards, just in case of need.
Once our dependency is set we are able to import the NbEditorKit class and compile our SchemeEditorKit.java file without problems. Remember that Alt+Shift+F in NetBeans performs an automatic import for you.
So we are ready to run our Scheme editor. Or not? Wait a minute. How are we going to register our SchemeEditorKit into the NetBeans Platform? How to tell the NetBeans Platform that we want to use our SchemeEditorKit when opening Scheme files?
Well, of course, by using our layer and inserting it into the NetBeans Platform Sandwich. That easy. In a declarative way. Without a single line of code. Let's do that.
Let's open our sandwich ("Important Files"/"XML Layer"/"in context") and let's try to find out where we should add our layer. There's an "Editors" folder there... and a "text" folder... and lots of file types ("x-java", "x-properties", "x-jsp", "html"...). Yes, I think this should be "Editors/text/x-scheme".
Let's verify we don't get fooled with folder display names vs. real names. I open the properties window and verify that yes, the "Editors" display name corresponds to the "Editors" name. Same for "text". So I assume we should the following set of nested folders: "Editors/text/x-scheme".
If you look under "Editors/text/x-java" (the folder corresponding to the EditorKit used to handle Java files in the NetBeans IDE) you'll see an entry named "instance of JavaKit". This means that there's a living Java object in the layer!!. This is something similar to having some tuna in your sandwich (I mean, you have tomato and lettuce, text files and property files, but the possibility of having Java objects in there is just cool. It's like being able to add some tuna and fancy stuff to your sandwiches, the more the flavors the better the final sandwich ;-) ).
So let's add a plain Java object to our sandwich, a plain Java object of type SchemeEditorKit. Under the "Editors/text/x-scheme" folder.
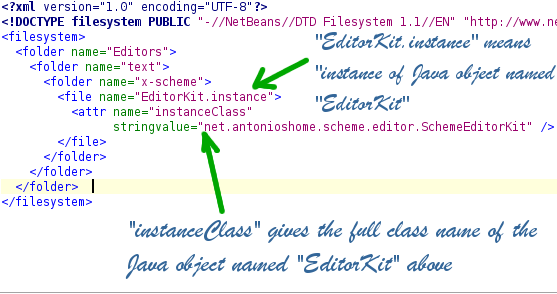
To add a living Java object in your layer you need a "file" type of entry (of course, entries can be either folders or files, and this is not a folder ;-)) with a special name ending with ".instance". Entries of type "file" with a name that ends in ".instance" represent living Java objects. So we'll be adding a "file" entry named "EditorKit.instance" (a living Java object named "EditorKit", to abbreviate). The "EditorKit" prefix is mandatory and fixed by the NetBeans Editor Module. The NetBeans Editor Module seeks for instances of Java objects named "EditorKit" under the folder corresponding to the mime-type of the file being opened. If you open a "text/x-java" file then the editor module will seek for a living Java object named "EditorKit.instance" under the "Editors/text/x-java" folder; and if you open a "text/x-scheme" file then the editor module will seek for a living Java object named "EditorKit.instance" under the "Editors/text/x-scheme" folder.
After adding our fancy living Java object named "EditorKit", we have to tell the XML layer what sort of object we're adding. That is done with an attribute inside the "file" element. This attribute must be called "instanceClass" (quite reasonable, I think) and it must have a stringValue with the name of the class.
So the result should be something similar to Figure 28, “SchemeEditorKit XML Layer file”. (There're alternative ways to add Java living objects in your XML layer file [2])
Remember that after cooking your XML layer you have to wash your hands. I mean, validate the XML file. Just in case. Right-click on the editor and choose "XML validate". Much better.
So let's run our Scheme Suite with our brand new SchemeEditorKit. This is going to be cool...
... well, not quite. The fact is that our SchemeEditorKit is correctly registered, but when we try to open a Scheme file... we have a white screen!!
Oh, why is that? Well, the fact is that it's because we have not defined a Syntax for our Scheme files, so the NetBeans editor module just doesn't know what to do with all our text, and everything is printed in white on white.
Furthermore, we haven't told the NetBeans Platform which key bindings to use. The platform includes several sets of key bindings. You have the NetBeans default key binding, or the Emacs one or the Eclipse one. We haven't specified that, so we have no key bindings.
And that's why we have a blank screen where you cannot move the cursor around.
So we'll have to add some color to our Scheme files. And specify some key bindings too. But that's just another story, that deserves a section of its own.
Although this section was dedicated to building an editor, we ended up having half an editor only, but and a more clear understanding of dependencies and XML layer files. Well, I think it has been worth the deal. After all, understanding how to manage dependencies is indeed important, isn't it? There are lots of good modules in there to depend upon, right? ;-)
So keep tuned for the next section (I'm still cooking it) that will tackle the wonderful world of NetBeans syntax highlighting. That would basically follow the directions of Geertjan's excellent tutorial on syntax highlighting, but with some extra reg-ex topping and some pointers to bleeding edge new ways to do things. Mmmm... Simply delicious!
[1] You'll need to add a dependency with "Editor Library"
[2] You can add a file entry with a name specifying the full class name of your object, using dashes instead of dots. For instance, you could say:
<file name="net-antonioshome-netbeans-MyObject.instance" />
to insert a living object of type "net.antonioshome.netbeans.MyObject".
| | | |
| 5. Bags and Rabbits (Lookup I/II) |  | 7. Scheme Editor Options |
blog comments powered by Disqus
