| 9. Adding Syntax Support | ||
|---|---|---|
 |  | |
As we saw in the previous section, there are different ways to add syntax highlighting to NetBeans. The "old" and "good" ways to do things required a Syntax object, responsible for tokenizing text. The young way (the lexer module) eases building such objects (and provides some other cool features).
In this section we'll take a look at Syntax objects. When the lexer module is stabilized I'll add a new section here about it.
The Syntax class has been around since 1999. At that time Java 2 had just been released. At that time microprocessors were somewhat slow (remember those Pentium II?), and so were the Java Virtual Machines (and Swing!). In 1999 the performance of Java based applications was a real issue.
Existing garbage collectors were not as fast as they are nowadays either[7], so memory consumption was also a concern.
So the design of the Syntax highlighting support in NetBeans was influenced by these tight constraints: it should be both time and space efficient. It should run fast, and it should consume as little memory as possible. As a penalty, defining a custom Syntax object is a little bit complex, and requires careful hand-coding.
This section is about building custom Syntax objects, that transform text into tokens.[8]
Let's start by creating our custom Syntax class, responsible for transforming text into TokenIDs.
The very first step to build a custom Syntax is (apart of having ready all the classes we talked about in the previous section, such as SettingsInitializers and TokenContexts) to extend the Syntax class, which is a little bit tricky.
Extending the Syntax class requires creating a public void constructor that updates a superclass variable (and this is the tricky part), and overriding the protected "parseToken()" method that translates text into tokens. The basic skeleton for building our custom Syntax object looks then like this:
public class SchemeSyntax
  extends Syntax
{
  public SchemeSyntax()
  {
    // The tricky part!
    tokenContextPath = SchemeTokenContext.contextPath;
  }
  // @Override
  protected TokenID parseToken()
  {
    // Some magic here!
    return null;
  }
}The editor module infrastructure will make calls to our overriden "parseToken()" method for us, automatically. And it will be making calls to that method until you analyze the whole text buffer.
And what's the text buffer we have to scan, you ask? Well, that's stored in an internal protected variable in the Syntax class. In fact we have some other juicy variables there. Let's take a look at what these variables mean:
- buffer
The buffer variable is the array of chars containing the text to be parsed. Note that we don't have to scan the whole array, but just a part of it. The editor infrastructure is responsible for telling us what part of the buffer we have to scan (and it performs some magic there so that we don't have to scan the whole buffer all the time!).
The part of the buffer we have to scan is stored as a set of offset and length integer variables. Let's review those:
- offset (and stopOffset)
The offset variable is an integer containing the current offset inside the buffer. So "buffer[offset]" is always the character we're currently looking at.
The stopOffset variable is another integer containing the maximum offset inside the buffer that we have to check. This is so because we don't always have to parse the whole file, sometimes we only have to check a part of it. The editor module keeps track of what parts of the file may have changed, and asks us to analyze the text between offset and stopOffset.
We are responsible for advancing "offset" until we reach "stopOffset". That's why the "parseToken()" usually has a loop like this:
protected TokenID parseToken() { while( offset < stopOffset ) { char currentChar = buffer[offset]; if ( this is a whole token ) return anAppropriateTokenID; else offset ++; } return null; }- lastBuffer
The lastBuffer variable is a boolean indicating if this is our last chance to process the buffer. If set to true then we should return whatever token we're currently parsing, even though we haven't finished yet.
Detecting the end of the buffer is important, and this is usually done after the loop above, like this:
protected TokenID parseToken()
{
  while( offset < stopOffset )
  {
    char currentChar = buffer[offset];
    if ( this is a whole token )
      return anAppropriateTokenID;
    else
      offset ++;
  }
  if ( lastBuffer )
  {
    // We may return an appropriate token
    // and reset internal state
  }
  return null;
}
Most NetBeans custom Syntax objects use the structure above to perform the lexical analysis of text. You may want to go take a look at the SQLSyntax, the JavaSyntax or at the NetBeans Syntax Highlighting Tutorial Syntax Example.
- state
The state variable is an integer containing the current state of our syntax object.
States allow you to react in different ways to the same character. Of course! Imagine you're analyzing a piece of Java code, you'll react differently to the slash "/" character if it's the first time you see it (like in " 1 / 2") or if you're seeing it immediately after a previous slash character (like in " // Comment ")!.
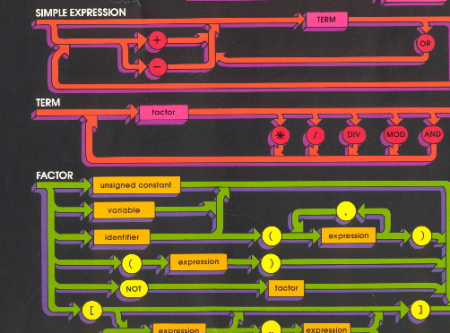
So Syntax objects work effectively as state machines: for each iteration on the loop (for each character in the text buffer) the token to be returned depends on the character itself and your current internal state. Figure Figure 38, “Sample states in JSON syntax” explains graphically how internal states allow you to know what part of a syntax branch you are analyzing.
- tokenOffset
The tokenOffset variable is an integer that represents the start of the current token. Whenever you return a token, the Syntax object keeps track of the offset, and stores it in the "tokenOffset" variable. This is an interesting variable, because you can know the whole text you're currently analyzing by using something like:
String currentToken = new String( buffer, tokenOffset, offset - tokenOffset );
This is what the SQLSyntax, does: it creates temporary Strings with the token currently under analysis, and then it compares that String against a list of keywords. This is an easy way to colorize your text: you basically create three categories of tokens: punctuation, whitespace and text. And then you compare the text with a predefined set of keywords.

So that's it. Building a custom Syntax object is not that difficult after all: it requires some some attention.
If you want to see real-life examples of custom Syntax objects you may want to take a look at NetBeans' SQLSyntax, the JavaSyntax or at the NetBeans Syntax Highlighting Tutorial Syntax Example.
But, hold down just a moment, there're some juicy tricks you may use to ease building custom syntax objects!!
Since building custom Syntax objects seems somewhat involved let's see some basic tricks to ease things.
If you take a detailed look at SQLSyntax you'll see a helper method that recognizes keywords. This helper method creates a new String from the text buffer (using "new String") and that then compares that String against a constant list of SQL keywords.
Of course they're creating new things, so this is not as space-efficient at the JavaSyntax, for instance. Anyway the current garbage-collection technology in recent JVMs has improved so much that creating these short-lived objects is very, very efficient nowadays.
In fact you can even create more interesting short-lived objects: you can create "Matchers" and use regular expressions to match keywords. As you probably know, regular expressions are strongly related to finite state authomata, and so may help us build our custom Syntax state machine. You could, for instance, define the following Pattern that is used to detect Scheme constructs:
private static Pattern CONSTRUCT  = Pattern.compile("and|begin|case|cond" +
    "|define|define-syntax|delay|do|else|if|lambda|let|let\\*|letrec" +
    "|letrec-syntax|let-syntax|or|quasiquote|set!|syntax-rules" );
And then use a helper function to detect if a part of the buffer is a Scheme construct or not, like this:
public boolean isConstruct()
{
  SegmentCharSequence chars =
    new SegmentCharSequence( buffer, tokenOffset, offset - tokenOffset );
  return CONSTRUCT.matcher( chars ).matches();
}
And we would only be creating a lightweight "SegmentCharSequence"[9] and a Matcher object per iteration. Again note we're trading space-efficiency by ease of development. And that seems fair to me.
Using regular expressions is most handy if you want to parse complex tokens, such as Scheme numbers. Scheme number syntax is somewhat involved, because you have rational numbers, complex numbers, and exact numbers, for instance. Choosing your regular expressions wisely may boost your productivity when building custom syntax objects.
Remember, again, that if you want to do things really efficiently then you may want to experiment with the lexer module: the new way to do syntax highlighting on top of NetBeans.
The second trick I suggest for building custom Syntax objects is to fully exploit unit testing. Building unit tests in the NetBeans IDE is just a piece of cake (just right-click on your custom Syntax.java and choose Tools/Create unit tests), and building unit-tests for your syntax is not that difficult either.
The NetBeans Syntax Highlighting Module Tutorial contains a good example for building your Syntax unit tests.
Java Server Pages can contain HTML code and/or Java code. Web pages contain both HTML and JavaScript code. These type of files, that include different languages, require the use of a MultiSyntax object. I won't be covering them here, though.
One of the objectives of the lexer module (the "young" way to do things) is to ease building syntax support for text files that (as in the JSP case) require different syntaxes. So if you need one of these I suggest you experimenting with the lexer module.
During the last weeks there has been some interesting movement in this new way of doing things. Geertjan has been talking about this new mechanism in his blog. If you find that building syntaxes "the old way" is too complex for you then you may want to explore this new, fancy API. I may cover it in the future, when it is considered more stable.
Meanwhile I will keep on using the old API. I may be interested in building standalone editors that use the NetBeans Editor API, like this small Scheme Editor Pane that I can use in small Swing Applications. I'll talk about those standalone editors either in my blog, or in a new section. Keep tuned for that.
[8] Note that Syntax objects work basically as incremental lexers, since they detect changes in the document and process only the part of the buffer that is affected. Normal lexers (such as JFlex) scan the whole buffer instead.
[9] SegmentCharSequence is both a CharSequence and a Segment.
public class SegmentCharSequence
  extends Segment
  implements CharSequence
{
  /**
   * Creates a new instance of SegmentCharSequence
   */
  public SegmentCharSequence( char[] buffer, int startOffset, int length )
  {
    super( buffer, startOffset, length );
  }

  public char charAt(int index)
  {
    if ( index < 0 || index > count )
      throw new StringIndexOutOfBoundsException( index );
    return array[ offset + index ];
  }

  public CharSequence subSequence(int start, int end)
  {
    if ( start < 0 || end > count || start > end )
      throw new StringIndexOutOfBoundsException( " start " + start + " end " + end );

    return new SegmentCharSequence( array, offset + start, end-start );
  }

  public int length()
  {
    return count;
  }
}
Note that Segments will be CharSequences in Java 6
| | | |
| 8. Colorful editors: The Old, The Good and The Young |  | 10. Wrapping Scheme into our IDE (Library Wrappers) |
blog comments powered by Disqus
