| 4. Sandwiches!! (XML Layer Files) | ||
|---|---|---|
 |  | |
Quotes should never be just stuck in. They are not filler. They lend authority to your paper. Examine your purpose. Determine if the quote will further your argument. What is its significance? The way to ensure that every quote you use is properly prepared and explained is by creating quote sandwiches. You will sandwich the quote between a top layer of explanation and a bottom layer of interpretation.

As we have seen in the previous section, all modules in the NetBeans Platform contain a misterious XML Layer file, a "sandwich" file. This file is so important that it lives inside the "Important Files" folder. In this section we'll explore a little bit this file, trying to understand what it does and how we can take advantage of it. Don't worry if you don't get the details, as I'll explain whatever modifications are needed as I go on building my Scheme IDE. Just get used to the terms. This is a long section. You'd better fetch some sandwiches before going any further ;-)
So, what can we do with those important "sandwich" XML Layer files, you ask? Well, you can do almost everything with them! Let's see some examples:
You can register and remove actions that contain your own logic that is invoked whenever an user action is performed. So, for instance, you can modify the menu bars, menus and menu items of NetBeans (that refer to actions).
You can register and remove JDBC drivers and connections in the platform.
You can configure lots editor functionalities, registering colors for color syntax highlighting, popup menus, special editors for your own file types, and more.
You can modify the Swing palette, the HTML palette (that contains HTML code snippets) or the NetBeans palette, you can add your own palette to your NetBeans Platform based application.
You can register and remove type of models, controllers and views so your application can handle your custom filetypes (you could build an application that handles RSS menu feed files, for instance).
You can register and remove options to the basic Options Dialog of your application. So, for instance, you could add a custom option dialog for Scheme-related settings (we'll do that in a future section).
You can register and remove XML catalogs that contain DTDs used to validate specific document types. So, for instance, you could add a DocBook catalog, so that NetBeans automagically pops-up autocompletion windows for your DocBook documents.
And there's even more! So, apart of being nutritive and good for your health, sandwich files are indeed very powerful.
As we have seen in the previous section, when creating the filetype for Scheme files, each NetBeans Platform module contains an XML Layer file. What NetBeans does at startup is to merge all those XML layer files.
![[Note]](images/note.png) | How XML layer files work |
|---|---|
At startup, the NetBeans Platform gets the XML layer file from each registered module, and then cooks a sandwich from those layers. The order of the layers is, of course, the order of initialization of modules, which, in turn, depends on the dependencies between them. |
Most NetBeans wizards (such as the one we used to include a filetype in our Scheme filetype module) modify the XML layer file for you, adding entries there "automagically". But of course you can build XML layer files by hand, using your preferred editor. In this section we'll see how to modify the XML layer file by hand, what its internals are, and most importantly, we'll observe how the NetBeans IDE allows you to see both your layer file and... the whole sandwich!!.
This feature is extremely useful, because it allows you to see if your XML layer file is fitting correctly in the "big sandwich" of XML layer files that you are building. This saves you lots of time, because you don't have to find out what the names of the different parts of the sandwich are. Let's see this with an example using the Scheme file-type module that we created in the previous section.
So, let's open again the NetBeans IDE and see our layer and the sandwich we're building. Open the "Scheme Filetype" module that we created in the previous section. Open the "Important files" folder and expand the XML Layer file. You'll appreciate that it takes some time to open the file for you. That's because NetBeans is cooking the sandwich (mergin all tomato, cheese and other layers) and preparing it for you. You'll see something similar to Figure 17, “How the sandwich looks like - tree view”
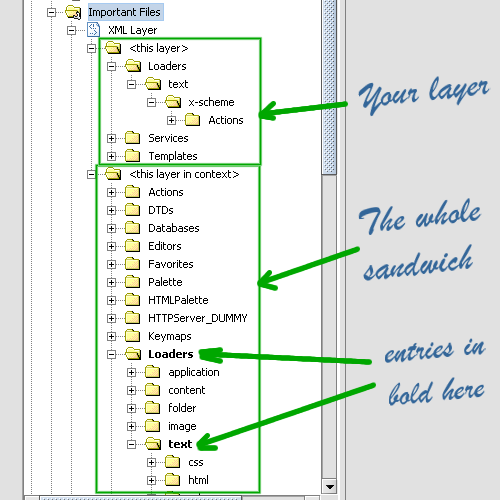
As you can see there are two main sub-folders under our XML Layer file. The first one ("this layer") represents your XML Layer file alone (i.e, the tomato layer of the sandwich, for instance). The second one ("this layer in context") represents your XML layer file after being merged with the rest of XML Layer files, the ones coming from the platform and all the other modules, the cheese, the lettuce and all the rest of layers: the whole sandwich!
Inside the sandwich there're some entries in bold font. These represent the folders in the tree that have been added from your layer. So, if your layer contains a "Loaders/text/x-scheme" folder (as is the case), the resulting sandwich will also contain these folders, and they'll be shown to you in bold font.
Of course you can (and should) modify the layer file yourself by hand. You do that by right-clicking on the layer file and choosing "Edit". That opens the XML layer file for your module inside the editor. Note that the XML file contains a DTD declaration in there. If you modify the file by hand, it's always a good idea to validate the XML file against that DTD, just to make sure there're as little typos as possible. You can validate the XML file by right-clicking on the editor pane and then selecting the "Validate XML" option in the popup menu.
XML layers are formed with three different types of elements: folders, attr (attributes) and files. These, in fact, resemble a filesystem, so that's why this mechanism is usually referred to as the "NetBeans XML FileSystem". Let's see a little bit what the components of this file are. We don't want to get into a lot of detail now, we'll see specific cases later on. Think of the following sections just as reference.
Folders are just a place to hold attributes and files. Folders just have a name. And that's all. Folders may be nested one inside another.
NetBeans comes with a predefined set of folders, whose names attend mainly to historical reasons. The "Actions", "Editors", "Menu Bar" and "ServiceS" folders, for instance, come bundled within the NetBeans Platform.
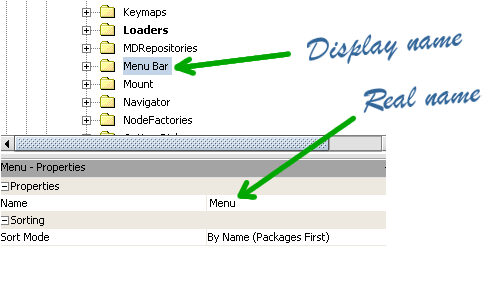
When you make reference to a folder in your XML layer file, make sure to use the real name of the folder, not its display name. The display name is the name that appears in the tree, but the real name (the one you should use in your XML layer file) is displayed only in the Properties window. If you use the display name in your XML layer file (and not the real name of the folder) then things won't work. See Figure 18, “Display name and real name of a folder” for details.
Files represent files that are bundled in your module. These can be XML files, plain text files or properties files (or any other sort of file, actually). The important stuff about files is that they may also be references to instances of Java classes. This is good, because it allows you to bundle Java classes in your layer that will become a part of the general sandwich. Action objects, for instance, are usually represented as files in the XML layer file.
Files contain a name and an optional url. If the files have an url then remember that the url is relative to the location of the layer XML file.
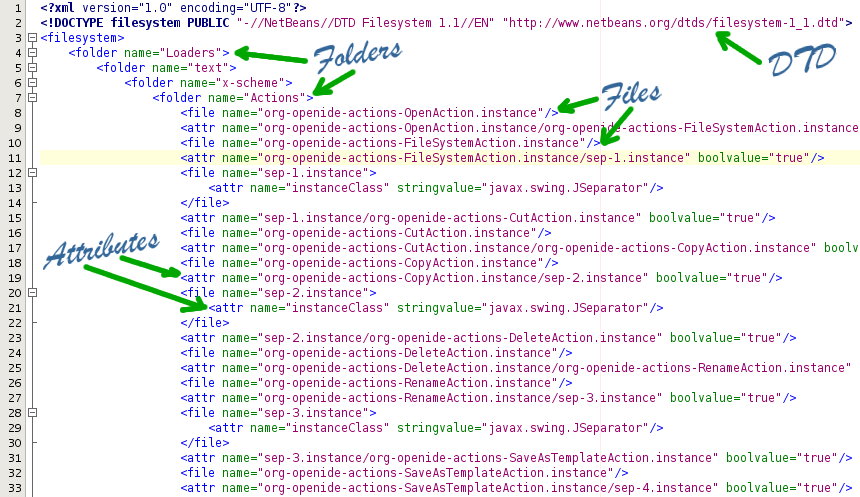
Attributes are applied to an enclosing folder or file, and represent values that affect how the folder or file work. Attributes have a name and a value, that can be primitive types (bytes, shorts, ints, longs, etc.) or strings or urls.
Attributes with the name "SystemFileSystem.localizingBundle" are special, because these have a "stringvalue" that points to a properties file used for internationalization (a Resource Bundle, actually). By adding one of these attributes to a file, for instance, you can easily internationalize it.
Attributes are also used to hide existing layers or parts of layers. Yes, layers may override each other, so a module can hide entries from a previous one. This is extremely useful, because it allows you to modify the default settings. You can, for instance, disable some entries in the Menu Bar.
Figure 19, “The contents of the XML Layer” shows an screenshot of the XML layer file.
In this section we've taken a quick bite to the XML layer and the resulting sandwich. We've learned a little bit about layers and sandwiches, what we can do with them and how they work to build a whole NetBeans Platform based application.
We've seen that the NetBeans IDE modifies the XML layer file for us, that we can modify it by hand (and that we should XML validate it before releasing our application).
In the next section (on the works now) we'll add an editor for Scheme files. And we'll have to cook our own sandwich to do that!
Keep tuned for that!
| | | |
| 3. Adding support for Scheme files |  | 5. Bags and Rabbits (Lookup I/II) |
blog comments powered by Disqus
